Do you remember? Recently we started with a blog series wanting to help you having an easy start with our Gantt chart control VARCHART XGantt and therefore getting you acquainted with the fundamentals of XGantt that are essential for integrating an interactive Gantt chart into your own scheduling application. This series wants to be a step-by-step-guide on aspects of VARCHART XGantt being important for the development of an application and furthermore it will introduce the wide range of design options to you.
Our last blog showed you how to install our control and - as promised - here comes part 2 of our blog series - consequently being about how to place the control on a form, how to supply VARCHART XGantt with data and how to calculate end dates of activities/ operations.
Your Sample to Start with: Tutorial Project 1
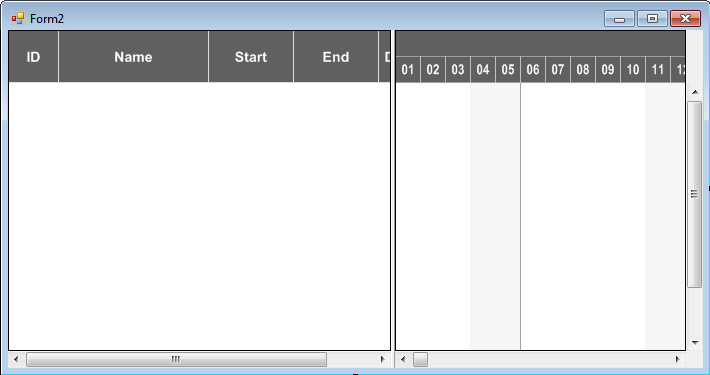
As developing environment for the code samples we use Visual Studio .NET 2010 upwards. Our first sample will show the below result:

Our sample collection includes the sample Tutorial Project 1 that demonstrates the inbuilt interactions of VARCHART XGantt and lets you easily comprehend the steps described in our blog series.
And now, off we go!
Placing the Gantt Chart Control on a Form
Reminder for the users of Visual Studio 2010: As already mentioned in our getting started blog #1, before dragging the Gantt chart control to the form please remember to change the target framework from .NET Framework Client Profile to .NET Framework 4 in the Application Settings (C#) or Advanced Compiler Settings (VB) since the former lacks the System.Design.dll, which is required by the property pages at design-time. If you don't change the framework an error message will pop up as soon as you try to drag the control onto the form.
To place the VARCHART XGantt control on the form, please select its icon ![]() in the toolbox and draw a frame at the position in the form where you want it to appear.
in the toolbox and draw a frame at the position in the form where you want it to appear.
If you wish the bottom and right-hand side of the VARCHART Windows Forms control to adjust to the full size of the window during runtime, use the anchor or dock property of the control.
Tip:
A "name space" instruction at the beginning of the program will save you the detailed reference indication when using data types and "enum" elements.
VB: Imports NETRONIC.XGantt
C#: using NETRONIC.XGantt;
VcNodeCollection instead of NETRONIC.XGantt.VcNodeCollection.
Supplying Data
For activities and links to be displayed, VARCHART XGantt needs to be supplied with data. By default, two tables are used for the necessary communication:
- NodeTable (also called Maindata)
- LinkTable (also called Relations)
When placing a VARCHART XGantt in the form, the basic fields will be set already.
Fields of the Maindata data table:
|
Index
|
Name
|
Primary key
|
Type
|
DateFormat
|
Editable
|
Hidden
|
|
0
|
ID
|
True
|
Integer
|
|
False
|
False
|
|
1
|
Name
|
False
|
String
|
|
True
|
False
|
|
2
|
Start
|
False
|
DateTime
|
DD.MM.YYYY
|
True
|
False
|
|
3
|
End
|
False
|
DateTime
|
DD.MM.YYYY
|
True
|
False
|
|
4
|
Duration
|
False
|
Integer
|
|
True
|
False
|
|
5
|
Completion
|
False
|
Integer
|
|
True
|
False
|
|
6
|
Grouping Field 1
|
False
|
|
|
True
|
False
|
|
7
|
Grouping Field 2
|
False
|
|
|
True
|
False
|
|
8
|
Release Date
|
False
|
DateTime
|
DD.MM.YYYY
|
True
|
False
|
|
9
|
Due Date
|
False
|
DateTime
|
DD.MM.YYYY
|
True
|
False
|
Fields of the Relations data table:
|
Index
|
Name
|
Primary key
|
Type
|
Editable
|
Hidden
|
|
0
|
Link ID
|
True
|
String
|
False
|
False
|
|
1
|
Predecessor Node ID
|
False
|
String
|
True
|
False
|
|
2
|
Successor Node ID
|
False
|
String
|
True
|
False
|
|
3
|
Link Type
|
False
|
String
|
True
|
False
|
|
4
|
Link Duration
|
False
|
Integer
|
True
|
False
|
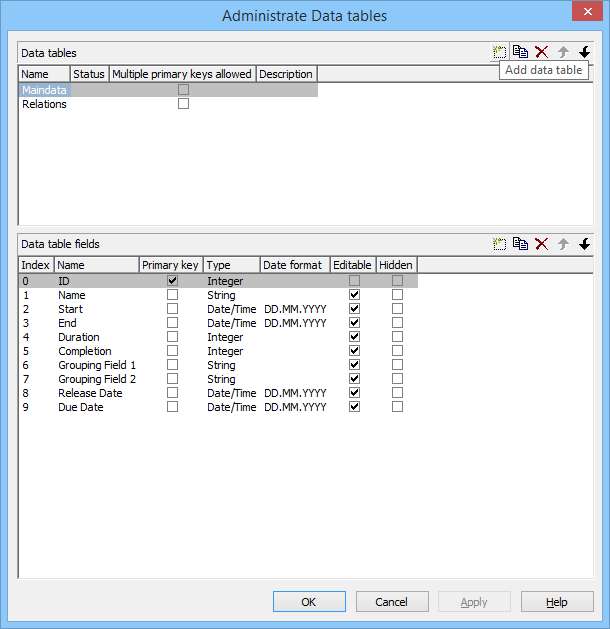
Further fields required need to be defined manually. You can do this at design time by the dialog Administrate Data Tables (lower section) or at run time by the method Add(...) of the object VcDataTableFieldCollection.
If you need more tables than the ones defined by default you can create them in the upper section of the dialog box Administrate Data Tables after having clicked Extended data tables enabled on the property page General.
The method DataRecordByID() of VcDataRecordCollection permits to quickly find objects by means of the primary key.
In order to make activities and links visible in our starter sample, you need to enter some records into the data table first.
This can be done by using the method Add(...) of the object type VcDataRecordCollection. The method EndLoading completes the data input for the corresponding chart to be composed. For this, please enter the following code lines in the Load event of the form.
Example Code C#
vcGantt1.ExtendedDataTablesEnabled = true;
VcDataTable dataTable = vcGantt1.DataTableCollection.DataTableByName("Maindata");
VcDataRecordCollection dataRecCltn = dataTable.DataRecordCollection;
dataRecCltn.Add("1;Node 1;04.05.2015;;5;;Group 1;Group A;");
dataRecCltn.Add("2;Node 2;11.05.2015;;5;;Group 1;Group A;");
dataRecCltn.Add("3;Node 3;18.05.2015;;5;;Group 1;Group B;");
dataTable = vcGantt1.DataTableCollection.DataTableByName("Relations");
dataRecCltn = dataTable.DataRecordCollection;
dataRecCltn.Add("1;1;2");
dataRecCltn.Add("2;2;3");
vcGantt1.EndLoading();
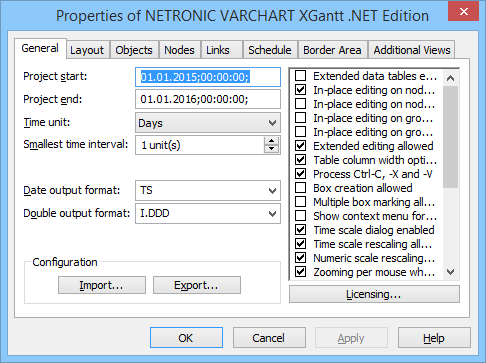
The values in a record are separated by semicolons. The order of the fields has to correspond to the order of the fields in the data definition. New records have to have an unambiguous identification which is not empty. The date in the record has to correspond to the DateFormat definition in the data definition table. The interpretation of the duration depends on the settings of Time unit. It is pre-set to days, which you can modify on the General property page.
The Date output format is defined consistently for the table and for each dialog on the General property page.
Loading data from a CSV file
Alternatively, you may also load the data from a CSV file. The structure of the file has to correspond to the below scheme:
**** Maindata ****
1;Node 1;04.05.2015;;5;;Group 1;Group A;2;Node 2;11.05.2015;;5;;Group 1;Group A;3;Node 3;18.05.2015;;5;;Group 1;Group B;**** Relations ****
1;1;2;
2;2;3;
Each record has its own line. The contents of the lines correspond to the parameters passed by the method Add(...) of the object type VcDataRecordCollection.
The records of the Maindata data table are listed first, followed by the records of the Relations data table. Use **** Table name **** to mark the beginning of a record group.
If you saved this kind of file for example by the name intro.csv, you may import the data as follows:
Example code C#
vcGantt1.Load(@"c:\intro.csv");
Specifying the period of time which is represented
Until now, you will see no activities, because the time scale has not been adjusted to the corresponding period. The displayed range of the time scale can be defined via the properties TimeScaleStart and TimeScaleEnd or determined from the data by the method OptimizeTimeScaleStartEnd(...) of the object VcGantt.
Example code C#
private void Form1_Load(object sender, System.EventArgs e)
{
vcGantt1.ExtendedDataTablesEnabled = true;
VcDataTable dataTable = vcGantt1.DataTableCollection.DataTableByName("Maindata");
VcDataRecordCollection dataRecCltn = dataTable.DataRecordCollection;
dataRecCltn.Add("1;Node 1;04.05.2015;;5;;Group 1;Group A;");
dataRecCltn.Add("2;Node 2;11.05.2015;;5;;Group 1;Group A;");
dataRecCltn.Add("3;Node 3;18.05.2015;;5;;Group 1;Group B;");
dataTable = vcGantt1.DataTableCollection.DataTableByName("Relations");
dataRecCltn = dataTable.DataRecordCollection;
dataRecCltn.Add("1;1;2");
dataRecCltn.Add("2;2;3");
vcGantt1.EndLoading();
vcGantt1.OptimizeTimeScaleStartEnd(3);
}
If you run the program now, the result should be as shown in the below illustration.

Calculating End Dates
The table column that holds the end dates is still empty. The end of an activity can be calculated from the fields Start and Duration by using the calendar which is included in VARCHART XGantt.
In the default calendar, the weekdays (Monday to Friday) are pre-defined as active times and the weekends (Saturday and Sunday) are defined as non-active times.
You can recognize the non-active times in the diagram by their gray background. The calendar may be switched off by deactivating the option Nodes use calendar on the Nodes property page.
Please note the difference in calculating when using and when not using a calendar:
An activity which starts on Friday and lasts for 3 days will end on Tuesday if the calendar is activated. Without a calendar, the activity will finish on Sunday already.
The end date can be calculated by using the method AddDuration(...) of the object VcCalendar. This requires the start and the duration of each activity. The fields can be accessed via their index. After having set the end date by the method set_DataField(...), the method Update() of VcNode needs to be invoked for the modifications to be displayed.
Example code C#
foreach (VcNode node in vcGantt1.NodeCollection)
{
VcCalendar tmpCal = vcGantt1.CalendarCollection.Active;
DateTime tmpDate = tmpCal.AddDuration((DateTime)node.get_DataField(2),
Convert.ToInt32(node.get_DataField(4)));
node.set_DataField(3, tmpDate);
node.Update();
}
Start and end dates of activities that were created or modified by mouse interactions are automatically placed in active times.

In contrast, dates that were set by the API or by editing dialogs can be placed in non-working times.

Dates that were generated by calculation are always placed in working times. In order to ensure dates set by the API to be placed in working times, the start date needs to be calculated from the end date and from the duration of the activity.
Example code C#
tmpDate = tmpCal.AddDuration((DateTime)node.get_DataField(3),
(-1) * Convert.ToInt32(node.get_DataField(4)));
node.set_DataField(2, tmpDate);
For keeping the data consistent, missing or negative durations should be treated as improper and be reset to 0. If the start date is missing, the end date cannot be calculated. The code was resumed in a separate method called SetNodeEndDate(...).
Example code C#
private void SetNodeEndDate(VcNode node)
{
// Avoid empty duration or negative duration
if ((string) node.get_DataField(4) == "" ||
Convert.ToInt32(node.get_DataField(4)) < 0)
node.set_DataField(4,"0");
// If the start date is empty then the end date should also be empty
if (node.get_DataField(2).ToString() == "31.12.1899 00:00:00")
node.set_DataField(3,"");
else
{
// "Assign calendar to nodes" on the Nodes property page has to be checked
VcCalendar tmpCal = vcGantt1.CalendarCollection.Active;
DateTime tmpDate = tmpCal.AddDuration(
(DateTime)node.get_DataField(2),
Convert.ToInt32(node.get_DataField(4)));
node.set_DataField(3, tmpDate);
// start date only in active timespans
tmpDate = tmpCal.AddDuration((DateTime)node.get_DataField(3),
(-1) * Convert.ToInt32(node.get_DataField(4)));
node.set_DataField(2, tmpDate);
node.Update();
}
The calculation of dates is required:
- After activities were loaded
- After dates or durations were modified by a data editing dialog or by an in-place editor
- After activity values were modified by the API
After modifications by mouse interaction however, a calculation does not need to be initiated since in this case, an internal calculation will be carried out automatically.
A computation loop which includes all nodes can be set up by the property NodeCollection of the VcGantt object. Its code will be added to the end of the event Form1_Load(...).
Example code C#
// Calculate end date for all nodes
foreach (VcNode node in vcGantt1.NodeCollection)
SetNodeEndDate(node);
Alterations of data caused by the user can be picked up by the event VcNodeModifiedEx. The method call added will calculate the end date.
Example code C#
private void vcGantt1_VcNodeModifiedEx(object sender, VcNodeModifiedExEventArgs e)
{
switch (e.ModificationType)
{
case VcModificationTypes.vcAnything:
//Node modified by Inplace Editor
SetNodeEndDate(e.Node);
break;
default:
break;
}
}
If values of data were altered by the API, the method SetNodeEndDate(...) has to be invoked explicitly.

Your next steps
You want to go on programming your application and can't wait for the next sequence of our blog series? We support you by providing a very comprehensive developer's manual, which we highly recommend to use. In addition to this, you can also download our free whitepaper offering 11 best practice tips including code snippets: