
With the 2013 R2 release of Dynamics NAV, Microsoft started to open up the opportunity for customers and partners to enrich both the Windows Client and the Web Client with JavaScript add-ins. Virtually from day one after the release, we started to explore this new capability - with the purpose of delivering graphical add-ins (interactive Gantt charts) that provide a business value to NAV. With this blog series, I like to share with you some of the development lessons we learned and also want to share with you some tips, tricks and workarounds. This blog series is intended to address developers who also consider building a JavaScript add-in for Microsoft Dynamics NAV.
Update (July 2018) re Dynamics 365 Business Central
All of the below had been published in 2014 when we started developing a JavaScript add-in for Dynamics NAV. In the meantime the world did not stand still and Microsoft released Dynamics 365 Business Central, which shares the code basis with NAV but implies a completely different go to market.
In my point of view - also given the initial experiences we made with D365 Business Central - all of lessons learned that I share here (and in the other posts of this series) also apply to D365 Business Central. Graphical client control add-ins embedded into Extensions are a great way to enhance the D365 BC user experience, and JavaScript is the way to go here.
If you are an ISV who develops an own vertical solution based on Dynamics 365 Business Central, and if you consider integrating a visual scheduler into your product, here is a link to follow. We actually wrote a (almost complete) guide for developing a Gantt Chart Scheduler for Microsoft Dynamics NAV and Dynamics 365 Business Central.
Some background: Gantt chart add-ins for Microsoft Dynamics NAV
NETRONIC has been working intensively on several control add-ins (rather than add-ons!) which enhance the Dynamics NAV user experience with interactive graphical capabilities to schedule, plan and manage production orders and bill-of-materials, jobs and job tasks, service orders and resources. This add-in development initially had been focused on the Dynamics NAV Windows Client, making use of the Client Extensibility Framework by complementing .NET add-ins to Dynamics NAV.
However, with Microsoft increasingly offering to his clients the freedom of choice between a Windows Client and a web-based system, we also decided to provide the same functionality to the Dynamics NAV Web Client and to develop a JavaScript add-in for Dynamics NAV.
Well, up to version Dynamics NAV 2013 it was just not possible to develop control add-ins for the Dynamics NAV Web Client. Hence, we created a special web viewer for our Visual Production Scheduler (VPS) that is running as a stand-alone web application inside a separate browser window. Please note: for the sake of getting a quick proof-of-concept, we decided to develop a “viewer” application first, and to provide interactive drag & drop scheduling functionality in a second step.
Here is how the VPS Web Viewer looks like today.

The obvious disadvantage of this solution is the lack of UI integration: When starting the VPS Web Viewer a new browser tab opens and the user leaves the UI of the Dynamics NAV Web Client. Instead, he is faced with a new web application with an own UI and a proprietary toolbar ribbon that differs from the Dynamics NAV action ribbon.
Fortunately, Microsoft has changed the inability to create Web Client add-ins with the Release of Dynamics NAV 2013 R2. Following the “develop one, deploy multiple times” idea, Dynamics NAV 2013 R2 offers the capability to integrate client control add-ins using JavaScript into both the Dynamics NAV Windows and the Web Client.
This gives us the opportunity to supply our customers with a version of the VPS Web Viewer that runs fully embedded in the NAV clients. Beginning of April 2014 (less than half a year after the 2013 R2 release!) we were able to present that new version as JavaScript add-in for Dynamics NAV.
With this blog series, I would like to share with you the experiences we have made so far on our journey developing JavaScript add-ins for Dynamics NAV that actually do not work as “proof-of-concept” but that provide a tangible business value to the users of Dynamics NAV. I suppose that you are familiar with the basics of creating control add-ins so that I can focus on the issues that are specifically related to the JavaScript add-in development.
All beginnings are not difficult ;-)
We started our work by studying the material provided by Microsoft: The step-by-step guide Walkthrough: Creating and Using a Client Control Add-in and the short Manifest Overview. In addition we had a look at the well prepared How Do I video series of Vjekoslav Babić.
Following all those instructions enabled us to quickly build a first skeleton for the new VPS Web Viewer control add-in. For this purpose we created a new Dynamics NAV page that includes our new JavaScript control add-in. This add-in appends the HTML kernel of the old VPS Web Viewer to the special HTML <div> element with ID controlAddIn, which had been provided by Microsoft to specifically enable JavaScript add-ins in the Dynamics NAV Web Client.
So far so good …
Things had been very straight-forward and the first steps had been made. However, we aimed at adding business value to Dynamics NAV and needed to go well beyond the basics. In the minute we left the basics, we noticed a gap in the documentation which left us with many questions unanswered.
Let’s have a closer look!
How to use external libraries: handling relative references
The first issue is referred to the usage of libraries. Of course, if developing large JavaScript applications you will not develop the whole code from scratch. Instead you will base your code on ready-to-use JavaScript libraries to avoid unnecessary costs and to save time – and so we did!
However, the way Dynamics NAV handles the different types of resources – i.e. JavaScript files, style sheets, and image files – makes it impossible to include external libraries straightforwardly. All used resource files have to be saved in separate folders (Script, StyleSheet, and Image) depending on their types. That is why you have to split all resources of a used library into three parts and copy them to the corresponding folders separately. Subfolders are not allowed. Hence, you have to set up a flat directory hierarchy:
C:NETRONIC.VPSWevClient.Resources| manifest.xml| +---Image| Loading-image.gif| Default-sprite.png| Netronic_Logo_200x28.png| Shrink_Time_Area_32x32.png| Stretch_Time_Area_32x32.png| +---Script| editor.min.js| editorcore.min.js| GanttControl-1.0.1.min.js| jquery-1.9.1.min.js| jquery.ba-resize.min.js| jquery.mousewheel.min.js| \---Stylesheet Editor.min.css Editorcore.min.css GanttControl-1.0.1.min.css
Afterwards, you have to declare all resources inside the manifest file:
<?xml version="1.0" encoding="utf-8"?>
<Manifest> <Resources> <Image>Loading-image.png</Image> <Image>Default-sprite.gif</Image> <Image>Netronic_Logo_200x28.png</Image> <Image>Shrink_Time_Area_32x32.png</Image> <Image>Stretch_Time_Area_32x32.png</Image> <Script>editor.min.js</Script> <Script>editorcore.min.js</Script> <Script>GanttControl-1.0.1.min.js</Script> <Script>jquery-1.9.1.min.js</Script> <Script>jquery.ba-resize.min.js</Script> <Script>jquery.mousewheel.min.js</Script> <StyleSheet>editor.min.css</StyleSheet> <StyleSheet>editorcore.min.css</StyleSheet> <StyleSheet>GanttControl-1.0.1.min.css</StyleSheet> </Resources></Manifest>
All files – i.e. the manifest file and all files from the three folders – are then zipped into one single ZIP file. After importing the resources – i.e. the ZIP file – into the Control Add-ins Resource page of the Dynamics NAV Windows Client they will be delivered to the web browser with modified names. As you can see from the following screenshot all resources are automatically renamed by prepending a number and repeating the file extension. E.g., the name of the file jquery-1.9.1.js had been changed to 635319509060000000_jquery-1.9.1.js.js:
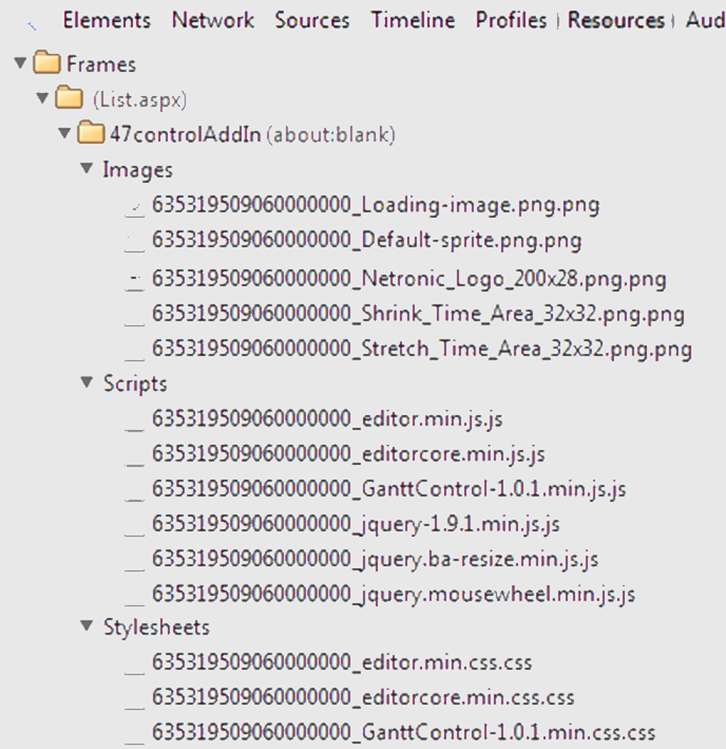
When building the web page, NAV automatically adds all references to script files and to style sheet files to the <head>-element of the control add-in HTML code as <script>- and <link>-elements, respectively. So far so good!
But with image resources, these automatic name changes cause some trouble. Imagine an external library that uses image resources of its own. The style sheets of this specific library – of course! - works with relative links to these resources. Guess what … these resources of this specific library cannot be found at runtime from the NAV Web Client since the names of the resources had been modified automatically.
Here is how we coped with this issue:
We copied all used image resources from all (external) libraries to the Image folder in the resource zip file. In addition we added some JavaScript code to overwrite at runtime those styles that are using image resources. Dynamics NAV offers the GetImageResource method to get the correct URL for an image resource specified in the control add-in manifest. In the following sample the image resource Loading-image.png is used by all elements of CSS class loading-image.
$('<style>').text('.loading-image { background-image:url("' + Microsoft.Dynamics.NAV.GetImageResource('Loading-image.png') + '"); }') .appendTo('head');
This dynamically adds the following <style>-element to the <head>-element of the generated HTML page:
<style>.loading-image { background-image: url("/DynamicsNAV71/WebClient/Resources /ExtractedResources/635319509060000000_Loading-image.png.png"); }</style>
As you can see, the style for all elements of CSS class loading-image had been overwritten and the reference to the image resource had been adapted to the actual value. Therefore this resource can now be found at runtime.
Please note: If there are references to images inside the JavaScript code of an external library, it is impossible to successfully perform the approach above.
What's next?
This was the first blog sharing our experience in developing JavaScript add-ins for Microsoft Dynamics NAV 2013 R2. Shortly, we intend to also share the following:
- Blog #2: How to dynamically load JavaScript code files and how to stretch the control add-in
- Blog #3: How to get the JavaScript add-in to work in the NAV Windows Client and some more thoughts
Please share with us in the comments your experiences in the development of JavaScript add-ins for Dynamics NAV and your thoughts on this blog post here. Looking forward to a great discussion.
Your next steps: Build your own JavaScript visual scheduler for Dynamics 365 Business Central and Dynamics NAV
In the meantime, we made the technology that we used to build our Visual Production Scheduler, also available for Dynamics NAV and Dynamics 365 Business Central developers. We call this the Visual Scheduling Add-in Development Toolbox and it comes with either a C/AL or an AL API. If you are a NAV/BC developer and want to build your own visual scheduler, you might have a look at this toolbox. By the way: you can download a trial version including a sample integration of a visual scheduler in Dynamics 365 Business Central and Dynamics NAV.
