
Two weeks ago, I started my series of blogs about the new version (5.1) of VARCHART XGantt by describing the new graphical features of our Gantt chart control. The release notes of this new version can be found here.
Here comes #2 of my series, where I'd like to give you some insights about what we've come up with concerning the snap tools making positioning objects easier.
Short reminder: Usage of snap tools
Since version XGantt 5.0 you can define so-called “snap targets” for nodes (or their layers), date lines, line grids and calendar grids. That means that these objects define certain places at themselves serving as targets of a “snap action” of other objects. When moving a node horizontally or modifying the size of a node or a layer, start or end date of this node or layer will be chronologically adjusted to the defined snap tools of the other objects. The start or end date will move towards the snap target within 5 pixels next to it thus taking over the exact date of the target.
Snap tools up to now: Automatically applied individual behavior for each node layout
In XGantt 5.0, special behaviors were applied automatically depending on the node layout (ungrouped, grouped, hierarchical arrangement; given that the according objects define snap tools):
- All node layouts: the layer-to-be-moved is adjusted to date lines, line grids and calendar grids.
- Ungrouped layout: The layer-to-be moved is adjusted to the layers of all nodes.
- Grouped layout: The layer-to-be-moved is adjusted to the layers of the nodes of one group (without subgroups). If the group is changed during the interaction, the layer will be adjusted to the objects of the new group.
- Hierarchical arrangement: The-layer-to-be-moved will be adjusted to the layers of the nodes of the same branch (with sub-branches). If the branch is changed during the interaction, the layer will be adjusted to the objects of the new branch.
Snap tools in XGantt 5.1: Enhanced by manually applied behavior
In addition to the above described automatical selection of nodes, Version 5.1 of our Gantt control now lets you manually select nodes.
For switching between the two selection modes a new property was added:
VcGantt.SnapTargetNodesSelectionMode which can be set at the API or in the Properties window and comes with the following values:
- vcAutomatically: Default, corresponding to the previous “Automatic” mode described above.
- vcUserSelection: Lets you switch to the new manual selection of nodes. Setting the new property VcNode.SnapTargetMode lets you select the nodes as possible snap targets.
The new property VcNode.SnapTargetMode offers the following values:
- vcNSTMNo: The Node is not selected as snap target. This works for both modes of VcGantt.SnapTargetNodesSelectionMode so that certain nodes can be excluded even when the automatic selection is switched on.
- vcNSTMAutomatically: Default, the node is automatically selected as snap target when VcGantt. SnapTargetNodesSelectionMode has been set to vcAutomatically. Does not affect vcUserSelection.
- vcNSTMYesOnUserSelection: Node is selected as snap target when VcGantt. SnapTargetNodesSelectionMode has been set to vcUserSelection. Does not affect vcAutomatically
Visualizing snap targets
When the corresponding boxes have been ticked, a node that is being moved or resized, will snap to snap targets, that, if these were defined at nodes or layers, weren’t sufficiently visible up to now. So we came up with two options to better recognize the defined snap targets:
- Snap lines can be drawn to the respective nodes or layers.
- The respective nodes or layers are indicated by snap markings.
The illustration below shows the possible options for snapping node 4054 to the start date of node 4056:
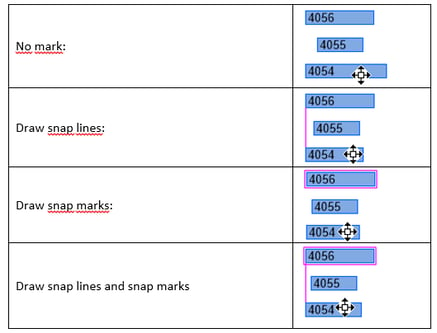
Both markings are only visible during the interaction. The layout options of both snap lines and snap marks currently can’t be modified.
The corresponding checkboxes for activating snap lines and snap marks can be found on the Nodes property page.
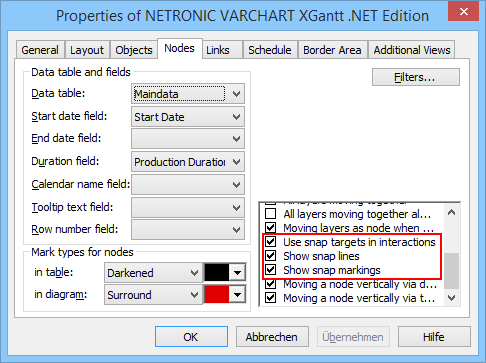
You have to tick the checkbox Use snap targets in interactions to be able to mark snap targets at all. Ticking/not ticking the other two checkboxes specifies the visualization of the snap targets.
You can also set these properties at the API, the data type being Boolean:
- UseSnapTargetsInInteractions
- ShowSnapLines
- ShowSnapMarkings
Next steps
Now try by yourself. If you do not use VARCHART XGantt so far, feel free to download a trial version. This version comes with full functionality, and we are happy to provide you with free tech support during your 30-days trial period.
Want to refresh your knowledge about snap tools in VARCHART XGantt? Read our blogpost on how to position nodes in Gantt charts with a snap.