
Picture this: You have a routine morning session. Everyone is in the meeting room, from the new IT intern to the Senior Procurement Manager. There are even fresh cinnamon rolls and coffee on the table. The Plant Manager walks in and breaks the silence with great news, the Purchase Order for the milling machine everyone has been waiting for has finally been approved. The Production Manager seems relieved. But now the slightly bad news... the machine needs specific configuration that must be taken care of before production begins.
In other words, you have a new resource to schedule jobs in, but, in 9 months! How can you plan around this?
In standard Microsoft NAV and Dynamics 365 Business Central, a Job Planning Line can only be assigned to a resource, not to a resource group. But let’s be honest here, in 9 months you can’t really know what changes you may have with your team: Someone leaving, someone new, someone getting a promotion, installing new machines, among many other facts. With the Visual Jobs Scheduler (VJS) you can easily bypass this restriction by creating a “dummy” resource and assigning a Job Planning Line directly to the new dummy resource. By adding the string “$VJSRG$” at the beginning of the Resource Number and assigning it to a resource group the VJS visually treats this resource as if it would be the group itself. Coming back to this example you can easily schedule things on the Milling machine that hasn't yet arrived.
With just four steps you can start scheduling projects on the long term. Let’s begin:
1. Create a dummy resource.
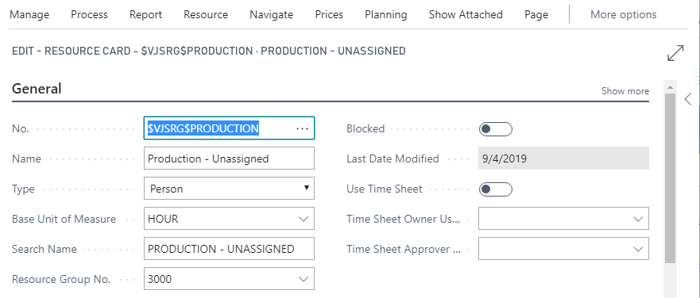
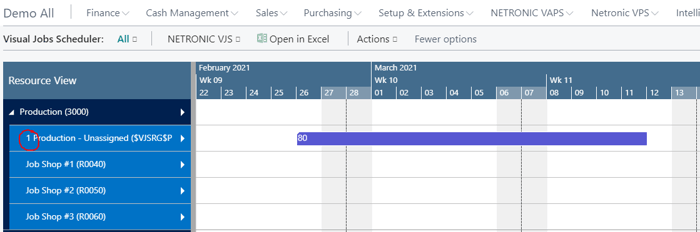
First you have to create a “dummy resource” which is where you will assign all Tasks in the Standby. Under “No.:” write the number starting with “$VJSRG$”. The resource name you enter here will be shown in the table. For this scenario we will create a dummy resource for Production and assign it to the resource group Production (3000).
2. Define capacity
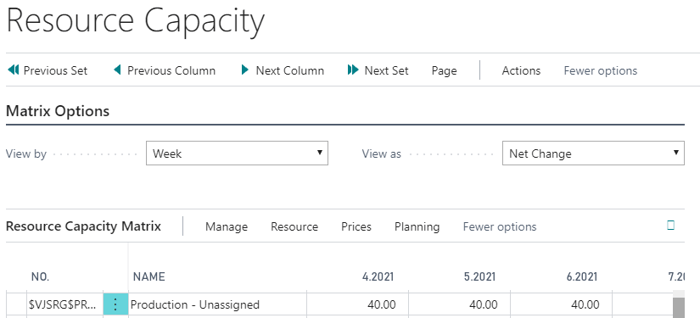
Practice tells us a good “rule of thumb” is to consider the average of capacity of all the resources that are in this group. In this case, considering that the machine will only work when an engineer is around, we would register a 40 hour per week capacity in the Resource Card.
3. Assign Job Planning Lines to the dummy resource
Select this resource for all new Job Planning Lines related to the project. Schedule them for the week of the year when you expect to product them without worrying about who will take care of it.
4. Define the right timescale
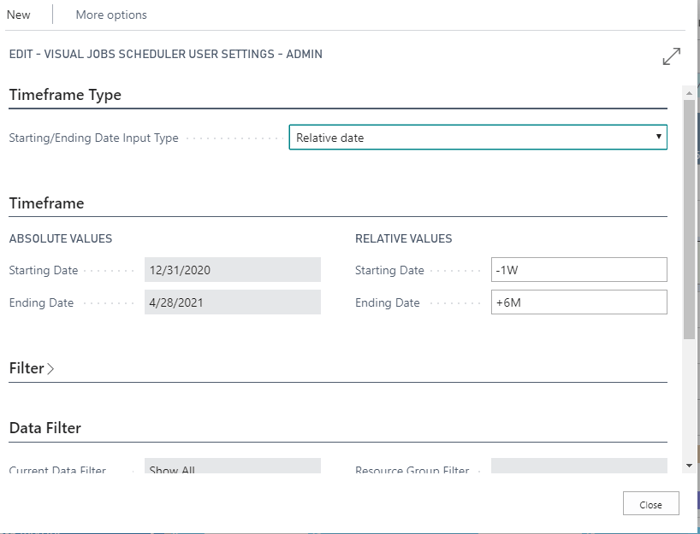
Click on the set-up configuration for User Settings to redefine the timescale for the period you would like to plan in your daily basis. Let’s say 1 week before your working day and six months ahead. The Timeframe would look something like this:
And now, forget about the project until the timescale reaches the tasks to be scheduled.
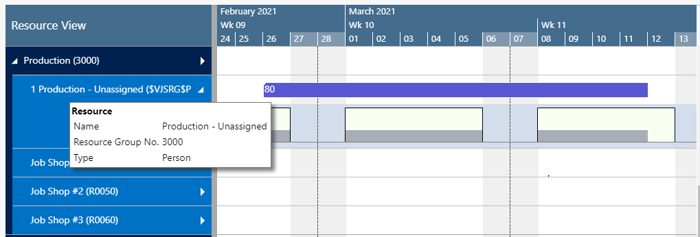
Later on, you can recognize the Planning Lines waiting to be scheduled by the number in front of the Resource Name. As you can see in this example, there is only 1 Job Planning Line containing 80 hours on the new Dummy Resource Level Group.
If you are interested in knowing more of how the Visual Jobs Scheduler can help you plan on the long term, make sure to check the VJS website and book a demo with a Scheduling expert.
Happy Scheduling!
